Quantcast
Channel: pacesettergraam
Viewing all 313 articles
Browse latest View live

Improve sound quality by PulseAudio Configuration

$
0
0

To improve audio quality with pulseaudio present: Everything in a code box is done in a terminal

1) Make a backup of default settings:

Code:
sudo cp /etc/pulse/daemon.conf /etc/pulse/daemon.conf.old

2) edit the daemon.conf to use the best resampler and the highest quality sample format:

Code:
sudo nano /etc/pulse/daemon.conf

3) find the following:
resample-method =
default-sample-format =

4) change both to: (make sure to remove the “;” before default-sample-format)

Code:
resample-method = src-sinc-best-quality
default-sample-format = [S]float32ne[/S]

Here you should put the results from running pacmd list-sinks and the information found on the line called sample spec. The first piece of information should be the sample format your card will work best with. For my case the output was

Quote:

sample spec: s32le 2ch 44100Hz

thus my sample format is s32le. The float32ne is simply a generic method.

SECOND ISSUE: If you know that you will be using audio of a higher frequency (AKA something above 48KHz such as a Bluray HD audio track). Then you will likely want to change this area.

Code:
alternate-sample-rate = 48000

to this

Code:
alternate-sample-rate = 96000

This will prevent resampling of audio that is @96KHz but it will create resampling of any audio @48KHz. As of right now I have no idea if more than 2 default sample frequencies/rates can be used. So you’re stuck with the choice of of which you want to avoid resampling. In my experience most sources even Bluray tracks seem to top out at 48kHz so I’d say leave it at 48000.

5) FOR MORE THAN JUST 2 SPEAKERS
change this accordingly (make sure to remove the “;” before each setting)
3 for 2.1 aka 2 speakers and a sub and (While 3 for 2.1 is valid and supported most 2.1 speakers don’t work properly with such a setting so you should tinker with that to figure out what works best for you)so 6 would equal 5.1 and 8 would equal 7.1 (you’ll have to add the locational name of each speaker you have in the channel map to make it work properly)
(a generic 5.1 setup edit to your needs)

Code:
default-sample-channels = 6
default-channel-map = front-left,front-right,rear-left,rear-right,center,subwoofer

SIDE NOTE: You might want to experiment with swapping subwoofer with lfe to see which one sounds best for you and your specific sound hardware. But make sure your hardware can handle the lfe as it is noted on occasion the lfe can destroy speakers or subwoofers.

6) IF YOU WANT TO MESS WITH LATENCY
Lower these numbers as much as you can (at 0 pulse will no longer work and ALSA will be used instead) but be careful they may introduce problems and flash will likely become a problem or may not work at all.
Apparently I goofed up here…though this is purely subjective to each person; the recommended thing to do is set a higher fragment number and size. For me I personally have had better results (lower CPU usage) with as few fragments as pulse will allow me (in my case it was 2) and as large a fragment size as I felt necessary (I’m at 400 right now). The changes here are really up to you. This section has been a source of problems as there’s much misinformation out on the net. The safest bet outside of default is to use more fragments and a fragment size of 50 or greater. This however is a generic method. If you want to know how to figure out the specific for your configuration setup for this part of audio you’ll need to be ready to do some math and have a read from the steps laid out by these guys at the mint forum: http://forums.linuxmint.com/viewtopic.php?f=42&t=44862
One note is that you should use your info from running pacmd list-sinks and then follow steps 2-3 in the mint guide.

Code:
default-fragments = 1 (4 is default)
default-fragment-size-msec = 1 (25 is default)

6.1) IF YOU WANT TO TWEAK THE PRIORITY TO INCREASE QUALITY
Find “nice-level” and change it from the default -11 to a high negative (remember -20 is max and not recommended). Remember as usual to remove the ; before “nice-level”.

Code:
nice-level = -15 #this setting increases the frequency/share of CPU time that Pulseaudio has access to

SIDE NOTE: Not confirmed by anyone else yet but it seems changing the priority has a negative effect on KDE’s system sounds so they’ll cause a second or two of glitching/blocky/ugly sound if something else is using audio. No idea why but the priority change might negatively effect sounds from DEs such as Gnome, KDE. Doesn’t seem to cause problems with other applications using sound though. UPDATE: Skype is another thing that doesn’t like the nice level or latency changes. If you make changes similar to this then make sure not have anything trying to use the sound server at the same time as Skype as it’s again one program that just doesn’t play nice with others. It works perfectly fine if nothing else tries to use the sound card so don’t worry there.

IF YOU WISH TO AVOID PULSEAUDIO AND INSTEAD USE ALSA ALONE Warning: Spoiler! (Click to show)

Make the fragment section of the config look like this:

Code:
default-fragments = 0
default-fragment-size-msec = 0

It should be noted that this will negate any of the changes made prior to this point as this is a lazy way of getting rid of pulseaudio without having to actually uninstall pulse audio. It works by simply causing pulse not to load as this is an incorrect setting. Thus, pulse should no longer show up in your process list or return a follow from running

Code:
ps -A | grep "pulse"

. This means that ALSA will be in charge of everything and configuring it is a whole separate topic. However, it seems most people believe that one does not have to configure ALSA at all as it should “just work” by default so you shouldn’t need to do any config work with it.

An alternative and likely better way to disable Pulseaudio is to change the following in the /etc/pulse/client.conf file:

Code:
; autospawn = yes

to

Code:
 autospawn = no

7) exit and save changes

8) Next you need to kill pulse so the old config settings are no longer in effect

Code:
pulseaudio --kill

9) Then you should check that your config is valid

Code:
pulseaudio --check

10) If it returns nothing then your config is fine and you can restart pulse with your changes implemented

Code:
pulseaudio --start

NOTE: These changes may increase CPU load and the sample format may not be supported by the audio hardware on your mobo or card. Lower the number from 32 to 24 to 16 until it works. Otherwise use the original default setting. It should be noted that using a float setting will always result in lower CPU load and better sound quality.


OAF Page Personalizations – read only issue

$
0
0

I just came across this problem when my collegue got this OAF Read Only Issue.

Read only OAF page

Read only OAF page

It’s frustrating sometimes, to deal with context specific issues with page personalizations. For example, not all field properties are allowed to personalize in all the contexts. This article describes one such issues of page personalizations become read-only and how to change it back to normal mode.


Have you also witnessed any such case? Page personalizations become read-only, when trying to edit. Above screenshot shows the personalize page for employee self service -> personal information self service page. Notice that, none of the page options are allowed to change and because of this issue none of existing personalizations take effect.

Well, the problem is because of the following option that is enabled in the XML MDS document of the page definition. Export page definition or XMLExporter command to see the page XML definition.

developerMode="true"

developerMode=”true” – One of the reasons for this string could be because of the profile option FND_PERSONALIZATION_SEEDING_MODE is set to Yes, last time when it was personalized.

Now we know where the problem is, solving it is piece of cake. :-) Export the page definition using functional administrator, edit the XML to remove this string and import it back. Needless to say, while importing back the modified XML, make sure to set the profile option FND_PERSONALIZATION_SEEDING_MODE is set to No.

Following screenshots show how the page XML looks like after editing and page becomes editable after import.

remove developerMode

Source


Listing All OAF personalizations in Oracle Apps

$
0
0

Use the below script to list all personalizations in the sytem.
We then can use the functional administrator to disable the personalizations in case it is required.

This would be very useful script at the functional administrator doesnt’ provide % search capabilities

I got this from metalink and putting it here for quick reference

SELECT PATH.PATH_DOCID PERZ_DOC_ID,
jdr_mds_internal.getdocumentname(PATH.PATH_DOCID) PERZ_DOC_PATH
FROM JDR_PATHS PATH
WHERE PATH.PATH_DOCID IN
(SELECT DISTINCT COMP_DOCID FROM JDR_COMPONENTS
WHERE COMP_SEQ = 0 AND COMP_ELEMENT = ‘customization’
AND COMP_ID IS NULL)
ORDER BY PERZ_DOC_PATH;

source


AP: Document Sequencing for Bank wise Check Payments

Getting ORG_ID in concurrent program

$
0
0

Sometimes we may get stuck to get the orgId in the concurrent to use so I have just given some screenshots by which we can have a overview of what profile option that we can use.

Using ORGID while passing in Concurrent Parameter so its directly we can select the Default type as Profile and then we can insert the Value as ORG_ID

Org ID in concurrent Parameter

Org ID in Value Set


For using OrgId in Value set we can use the FND_PROFILE.VALUE(‘ORG_ID’) for restricting values in value sets.

Org ID in Value Set

To have a full info of the available Profile options we can go to the respective Responsibility and search for the profile as shown in the below screenshot.

Available Profile options

Available Profiles

Thank you


How to display HTML in content (OAF)

$
0
0

The Digital Space !!

Problem 1 : Some data in database has multiple spaces between words. But when that is rendered on page using message styled text, the multiple spaces between the words are trimmed to single space by default. But you want the number of spaces to be retained as it is.

Problem 2 : You have a varchar data which has some delimiter in between. When displaying it in page, you want the data to appear in multiple lines based on delimiter. ex: abc-deft-lmnop  should come in 3 lines : abc in one line,deft in one line and lmnop in one line.

Solution : Use OARawTextBean (item style : rawText). rawText bean renders the data as html code. hence your data can containg html tags in between to server your purpose.

Solution 1 : when fetching the data from database, fetch it as : select replace(column_name,’ ‘,’ ’) from dual
If you have multiple…

View original post 27 more words


API and Script to Create Supplier Site

$
0
0

Below is the API and Script to Create Supplier Site in Oracle R12

— API to Create Supplier Site

DECLARE
l_vendor_site_rec      ap_vendor_pub_pkg.r_vendor_site_rec_type;
lc_return_status         VARCHAR2(10);
ln_msg_count            NUMBER;
lc_msg_data               VARCHAR2(1000);
ln_vendor_site_id     NUMBER;
ln_party_site_id         NUMBER;
ln_location_id            NUMBER;

cursor c is

select asup.vendor_id, assa.VENDOR_SITE_CODE,  hl.address1, hl.city, hl.country from ap_suppliers asup,  ap_supplier_sites_all assa, hz_parties hp,
hz_party_sites hps,  hz_locations hl where
asup.party_id =  hp.party_id
and assa.vendor_id = asup.vendor_id and
hp.party_id = hps.party_id and  hps.location_id = hl.location_id
and asup.vendor_id not in ( select vendor_id from ap_supplier_sites_all where org_id  in (564));       –29027

BEGIN
MO_GLOBAL.SET_POLICY_CONTEXT (‘S’, 567);

FND_GLOBAL.APPS_INITIALIZE ( USER_ID => 10835, RESP_ID => 51469, RESP_APPL_ID => 200 );
for i in c loop
— —————
— Required
— —————
l_vendor_site_rec.vendor_id               := i.vendor_id;
l_vendor_site_rec.vendor_site_code      := i.vendor_site_code;
l_vendor_site_rec.address_line1         := i.address1;
l_vendor_site_rec.city                           := i.city;
l_vendor_site_rec.country                    := i.country;
l_vendor_site_rec.org_id                      := 564;

— ————–
— Optional
— ————–
l_vendor_site_rec.purchasing_site_flag  :=’N’;
l_vendor_site_rec.pay_site_flag         :=’Y’;
l_vendor_site_rec.rfq_only_site_flag    :=’N’;

pos_vendor_pub_pkg.create_vendor_site
(
— ——————————
— Input data elements
— ——————————
p_vendor_site_rec    => l_vendor_site_rec,
— ———————————
— Output data elements
— ———————————
x_return_status         => lc_return_status,
x_msg_count             => ln_msg_count,
x_msg_data                => lc_msg_data,
x_vendor_site_id      => ln_vendor_site_id,
x_party_site_id         => ln_party_site_id,
x_location_id            => ln_location_id
);

—    insert into oaf_debug values(sysdate, 1, i.vendor_id||’Vendor ID and Return Status’||lc_return_status, ln_msg_count);

if (lc_return_status <> ‘S’) then
—                    dbms_output.put_line(‘Encountered ERROR in supplier site creation!!!’);
—                    dbms_output.put_line(‘————————————–‘);
—                    dbms_output.put_line(x_msg_data);
IF ln_msg_count > 1 THEN
FOR j IN 1..ln_msg_count LOOP
insert into oaf_debug values(sysdate, 1, i.vendor_id||’Vendor ID and Return Status’||lc_return_status, (substr(FND_MSG_PUB.Get( p_encoded => FND_API.G_FALSE ),1,255)));
END LOOP;
END IF;
ELSE
null;
—      dbms_output.put_line(‘Supplier Site Created!!!’);

end if;

end loop;
COMMIT;

EXCEPTION
WHEN OTHERS THEN
ROLLBACK;
DBMS_OUTPUT.PUT_LINE(SQLERRM);
END;

Sometime you may end up in a Error like this : Operating unit access is not allowed.  Please check that you have access to the operating unit:

Operating Unit Info is null

In Case you get this Error check the Profile Option MO:Security Profile, MO: Operating Unit and dont forget to include fnd_global.apps_initialize.


The MO: % Profile Options in Oracle Apps

$
0
0

The Difference between the three Profiles are given below.
The MO: Default Operating Unit profile option only provides access to one operating unit and this is used as the default operating unit during transaction entry.
The MO: Operating Unit profile option only provides access to one operating unit
The MO: Security Profile provides access to multiple operating units from a single responsibility.

So regardless of whether MO: Default Operating Unit or MO: Operating Unit are set, in order to access multiple operating units the profile MO: Security Profile must be set.


Org ID and Set of Books ID in Oracle Finance

$
0
0

Kishur's Weblog

In Oracle Finance Org ID and Set of Books ID stored in two different place. You may select the below table record to find the Org ID and SOB ID.

Org ID – select * from hr_all_organization_units

Set of Books ID – select * from gl_sets_of_books

In certain situation Oracle Finance developer find difficulty to join this tables. Instead of writing a new join query you may select this ID’s from the hr_operating_units. This tables stored the Org ID and SOB ID in the same table.

View original post


GL Journal Approval in Oracle apps

$
0
0

Journal Approval is a feature in General Ledger to send journals for approval to appropriate management before those can be posted. Journal approval uses Oracle workflow to control and monitor the approval process. Before using this feature, it must be enabled for the set of books.
Below are the setup steps.

Step 1: Enable Journal approval on the Set of Book level

Responsibility: General Ledger SuperUser
Navigation: Setup > Financials > Books > Define
Create the Set of Books

Go to Journalling tab

Check the box, Journal Approval. Save and close the form.

Step 2: Enable Journal approval on the Journal Source level

Responsibility: General Ledger SuperUser
Navigation: Setup > Journal > Sources

Check the box, Require Journal Approval, on the sources for which the journals have to be approved before those are posted.

Step 3: Create employees

For a shared HRMS installation
Responsibility: General Ledger SuperUser
Navigation: Setup > Employees > Enter
Since I have a full Oracle HRMS installation I cannot give you the screenshot of this form as it gives me an error on opening.
For a full HRMS installation
Responsibility: HRMS Manager/SuperUser
Navigation: People > Enter and Maintain

Create the employees who have to be in the approval hierarchy.

Step 4: Set authorization limits

Responsibility: General Ledger SuperUser
Navigation: Setup > Employees > Limits

Enter the employees in the hierarchy and set their limits.

Step 5: Set the profile options

The values of the following profile options will be set

Profile Option Name Meaning
Journals: Allow Preparer Approval Determines whether journal preparers can approve their own journals
Journals: Find Approver Method The default method to identify the approverThe methods are:
  1. Go Direct
  2. Go Up Management Chain
  3. One Stop Then Go Direct

Journals: Allow Preparer Approval

Journals: Find Approver Method

Options for this profile option


Step 6: Check the Journal Approval workflow

Open Workflow Builder and connect to the APPS database. Open the workflow named, Journal Batch.

Check the process named, GL Journal Approval Process.

This is the process in which the Journal will be approved.
The procedures and functions that are called from the workflow are located in the database package named, GL_WF_JE_APPROVAL_PKG. It does not contain the customizable procedures.
The customizable procedures are grouped together in another package, GL_WF_CUSTOMIZATION_PKG. There are 4 procedures in this package and can be modified as per your requirement as per Oracle. These procedures are referred to by the following workflow functions,

  • Customizable: Is Journal Batch Valid?
  • Customizable: Does Journal Batch Need Approval?
  • Customizable: Is Preparer Authorized to Approve?
  • Customizable: Verify Authority

Additionally Oracle allows modification/customization of the process named, Customizable: Verify Authority Process.

Oracle has defined the barebones of this process

You can add your own logic as per the business requirement.
After completing all these steps you are all set to use Journal approval process in Oracle. You can test the approval functionality as shown in Steps 3 & 4 in this article.

Source


Invoking Report Based on Trigger in Oracle Apps

$
0
0

We have a Requirement that to run the Payment Voucher Report when user makes the payment.

Trigger1

So we have a Trigger for the purpose and Trigger is on IBY_PAYMENTS_ALL table. So when a payment is Made this trigger will be initiated.

In the trigger the Concurrent Request will be called and depending on the Operating Unit the Report Layout will change and the request will be submitted. I have attached the script in this Blog. Below is the script.

XX_check_print_trg1

Now you can just Include a Menu in the forms like View Payment Voucher Report Button and then the report comes. This is one way of automating the report invocation.


Submitting a Concurrent Request from BackEnd in Oracle apps

$
0
0

Sometimes there will be some validation that prevents us to submit Concurrent Request from frontend. So at that time we can submit the concurrent request from backend.

Below is the script to submit concurrent request from backend.

DECLARE
LN_REQUEST_ID   NUMBER := 0;
BEGIN
MO_GLOBAL.SET_POLICY_CONTEXT (‘S’, 567);
FND_GLOBAL.APPS_INITIALIZE (USER_ID           => 10835,
RESP_ID           => 51546,
RESP_APPL_ID      => 200
);
LN_REQUEST_ID :=
FND_REQUEST.SUBMIT_REQUEST
(APPLICATION      => ‘IBY’,
PROGRAM          => ‘IBY_FD_PAYMENT_FORMAT’,
DESCRIPTION      => ‘Format Payment Instructions’,
START_TIME       => SYSDATE,
SUB_REQUEST      => FALSE,
ARGUMENT1        => 46602,
ARGUMENT2        => ‘N’
);

IF LN_REQUEST_ID = 0
THEN
INSERT INTO OAF_DEBUG_TEMP
VALUES (SYSDATE, 1, ‘Concurrent Request Failed to Submit.’, NULL);
ELSE
INSERT INTO OAF_DEBUG_TEMP
VALUES (SYSDATE, 1, ‘Concurrent Request Successfully  Submitted’,
LN_REQUEST_ID);
END IF;

COMMIT;
EXCEPTION
WHEN OTHERS
THEN
INSERT INTO OAF_DEBUG_TEMP
VALUES (SYSDATE, 1, ‘Inside Exception’, NULL);
END;

Thank you.


GL Balances info and Query

$
0
0

To Check the Available funds

GL Super User –> Inquiry –> Funds

Now you can query the information that you need. To show it month wise you can go to Tools –> Period Balances and then if you need more information about the particulare Periods Information you can again go to Tools –> Budget Lines, Actual Lines and Encumbrance Lines accordingly.

Below is the Query for GL Balances

Funds Available in Oracle apps

SELECT
SUM (NVL (gb.begin_balance_dr, 0) – NVL (gb.begin_balance_cr, 0))
beginning_bal,
SUM(  NVL (gb.begin_balance_dr, 0)
– NVL (gb.begin_balance_cr, 0)
+ (NVL (gb.period_net_Dr, 0) – NVL (gb.period_net_cr, 0)))
end_bal
FROM   gl_balances gb, gl_code_combinations_kfv gcc
WHERE   gb.code_combination_id = gcc.code_combination_id
AND gcc.CONCATENATED_SEGMENTS =
’01-00-52217-000-00-00′   — Enter GL Account
–AND gb.ledger_id             = 2021 — Enter the Ledger
AND gb.Actual_flag = ‘E’–Encumbrance
AND gb.period_name = ‘JAN-16’                    –Enter the Period
AND gb.currency_code = ‘OMR’.


HRMS to GL Mapping Issue

$
0
0

I got a weird Issue from finance department that they were unable to get the payroll information. When I checked the costing report in HRMS everything seemed fine. Then on seeing the backend information I was able to see that LedgerID and Chart of Accounts ID was missing from the GL_INTERFACE table.

I checked the GL Mapping there the mapping was not there.

Navigation

Global HRMS Manager –> Payroll –> GL Flexfield Map.

Now after the mapping is done Issue is resolved.


Adding Invoice and registering as asset

$
0
0

To add the Invoice to the Fixed Asset first we have to put a Invoice and then make sure that Given Account is a Asset Account and then Validate the Invoice and make accounting once done run the Concurrent named Mass Additions Create with parameter as GL date which is Given in Invoice and select the Book that the Asset has to be registered.

Invoice Distribution Line

Invoice Distribution Line

Below is the Screenshot of the program

Mass Additions Create in AP

Mass Additions Create in AP

Once this is done you can check the same by running the Mass Additions Create Report and then you can verify the output whether the particular invoice has been send to FA and then you can go to Fixed Assets and check in Mass Additions the Invoice will be coming as new and then you can give the category and other fields and post as a Asset.


Error in Requisition AME(The attribute REQUISITION_TOTAL has invalid usage.)

$
0
0

When a user was trying to create a Requisition he was not able to because the approver list was not created and then when I checked the AME. In AME test workbench I checked with the Transaction ID. The Requisition Header ID is the transaction ID and then when I checked I got this Error

Warning

The attribute REQUISITION_TOTAL has invalid usage. Approver list may not be genarated if this attribute used in conditions.

AME attribute has invalid usage

AME attribute has invalid usage

So I just checked the attribute and it is fine. So I checked the SR and got the document(Doc ID 951573.1).

ERROR
The attribute REQUISITION_TOTAL has invalid usage. Approver list may not be generated if this attribute used in conditions.

Steps To Reproduce:
The issue can be reproduced with the following steps:
1. Log in as Approvals Management Business Analyst.
2. Click test for Purchase Requisition Approval.
3. Click run real transaction test.
4. Enter the requisition_header_id and click go.
5. The message below appears:

“The attribute REQUISITION_TOTAL has invalid usage. Approver list may not be generated if this
attribute used in conditions.”

Cause

The profile option “POR: Default Currency Conversion Rate Type” is not set

The dynamic query that calculates the REQUISITION_TOTAL uses the Currency, Rate Type, Rate Date, Rate, Price and Amount to obtain the final value.

Solution

To implement the solution, please execute the following steps:

1. Navigate to System Administrator responsibility navigate to  > Profiles > System
2. Query profiles POR: Default Currency Conversion Rate Type
3. Set the value correctly at the Site level.


Getting Code Combination ID using fnd_flex_ext.get_ccid

$
0
0

Sometimes for Retrival of the Code Combinations the view(gl_code_combinations_kfv) will not be enough. We need a function to get the value so at that time we can use fnd_flex_ext.get_ccid to get the Code Combination.

select fnd_flex_ext.get_ccid(

‘SQLGL’, –Application Short Name

‘GL#’, –key_flex_code

50357, –structure_number   => this value we can obtain from this Query –select chart_of_accounts_id from gl_sets_of_books where set_of_books_id = 2021;

sysdate, –Validation Date

’01-00-11113-001-00-00′ –Concatenated Segments

) from dual;


Concurrent Request Completed with Warning

$
0
0

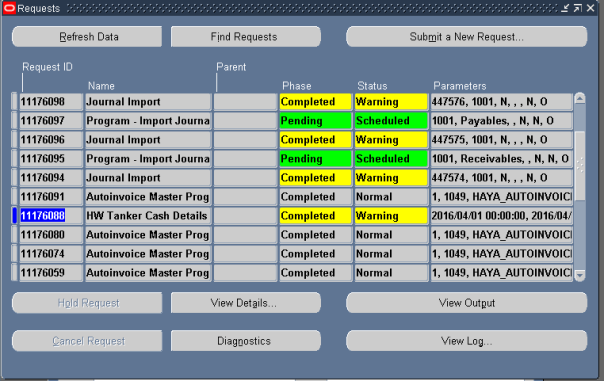
We are facing Issue while running report in TEST Instance.


Below is the Screenshot.

Completed Warning

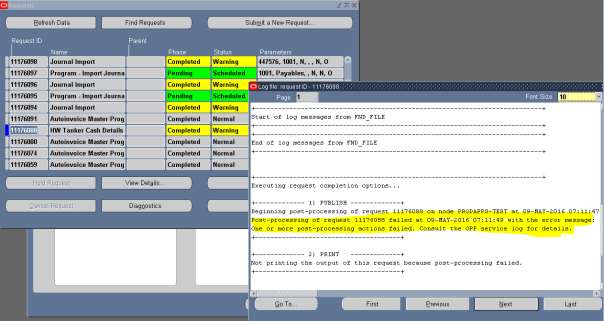
While Checking the log

Log file Info


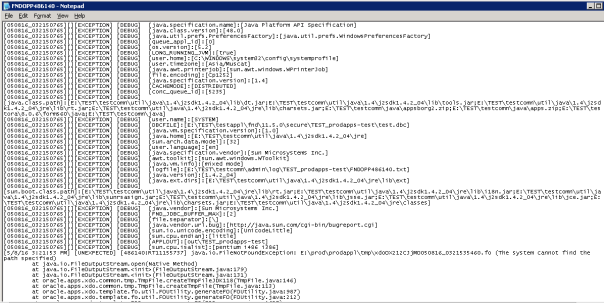
And by the Checking the OPP log file for the concurrent Program Im getting this as below

The Log file’s Location can be found by this Query

SELECT fcpp.concurrent_request_id req_id, fcp.node_name, fcp.logfile_name
FROM fnd_conc_pp_actions fcpp, fnd_concurrent_processes fcp
WHERE fcpp.processor_id = fcp.concurrent_process_id
AND fcpp.action_type = 6
AND fcpp.concurrent_request_id = <request_id>;

OPP file info

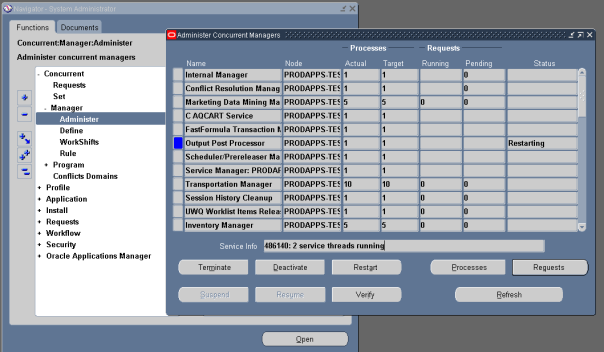
After doing some search I got this to Restart the OPP

– Log on to System Administrator Responsibility
– Navigate to Concurrent > Manager > Administer
– Scroll down and look for “Output Post Processor”
– Click on Activate

OPP Restarting

As the  Error is telling the about the path so to check the OPP path

Navigation

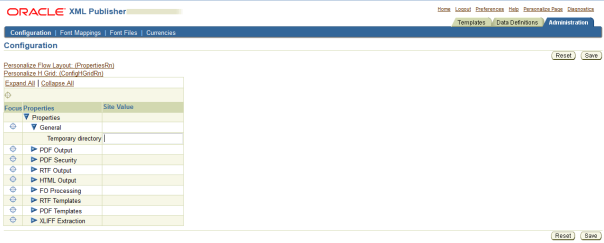
XML Publisher Responsibility –> Admisitration

Check the Below screenshot for the path defined

OPP path in Oracle apps

Once this is done now the report works correctly.

Thank you.


Listing Employees Based on Elements

$
0
0

Listing Employees Based on Elements

Sometimes we need to get a report based on Elements and everytime we cant write a Query as it consumes time by the way. So there is a Inbuilt form which is found in the above screenshot that is List Employees by element. So by this we can easily get the list of employees by the element.


XML BI Publisher IF statement Logical OR syntax in RTF Template

$
0
0

A question came through today: what is the syntax for a logical OR in a BI/XML Publisher IF statement?

The standard BI Publisher “IF” statement doesn’t seem to cut it.

Lets say I want a test:

if (a=1 or a=2)  then output_my_stuff end if

I don’t want to have to repeat output/logic like:

if(a=1 or a=2 or a=3)
then
 tag_should_be_exe
end_if

A solution is to use if statement structure. So we have:

<?if:GRADE=’1′ or GRADE=’2′ or GRADE=’3′ or GRADE=’4′?>

<?end if?>

If it works use it!

Source


Viewing all 313 articles
Browse latest View live